
Ever tried to do your own nails and felt like you were missing something? Maybe it’s time to consider nail drill bits. They’re like the secret weapon in the world of nail care. These little tools can make a huge difference, whether you’re cleaning up cuticles, removing gel polish, or shaping acrylics. But with so many options out there, picking the right one can feel overwhelming. Don’t worry, though. This guide will walk you through everything you need to know about nail drill bits, from choosing the right one to using it safely and keeping it in top shape.
Key Takeaways
- Nail drill bits come in various shapes and materials, each suited for specific tasks.
- Choosing the right bit depends on the job, whether it’s cuticle care or gel removal.
- Proper nail preparation is essential before using a drill bit to avoid damage.
- Safety first: always start with a low speed and apply light pressure.
- Regular cleaning and maintenance of drill bits ensure their longevity and performance.
Understanding Nail Drill Bits
What Are Nail Drill Bits?
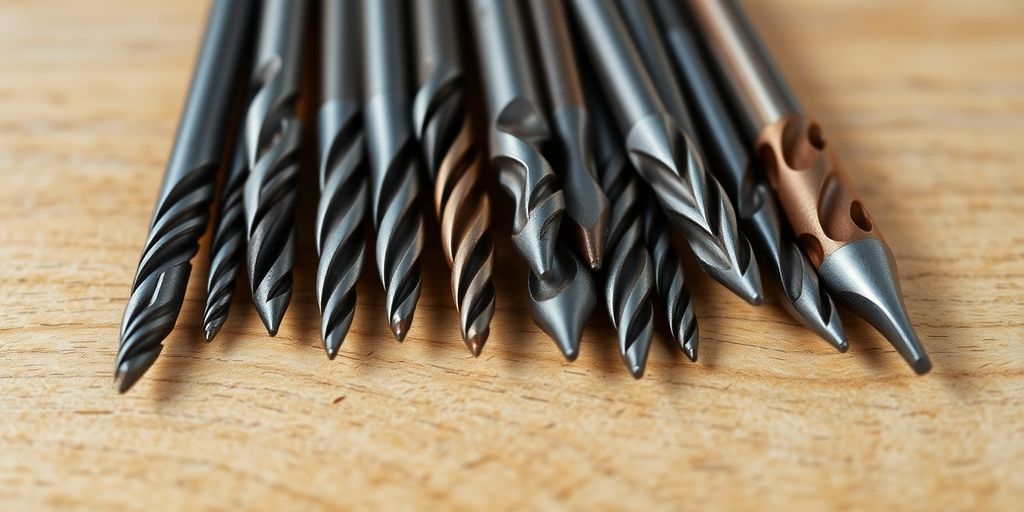
Nail drill bits are the unsung heroes in the world of nail care. These little tools, when paired with an electric nail drill, help you tackle a range of tasks—from shaping and smoothing to removing stubborn nail polish. Think of them as the Swiss Army knife for your nails. They come in different materials like tungsten carbide, diamond, and ceramic, each offering its own level of durability and effectiveness. Whether you’re a professional or just someone who loves doing their nails at home, knowing the right drill bit to use can make a world of difference.
Common Materials Used
When it comes to nail drill bits, the material is key. Here’s a quick rundown:
- Tungsten Carbide: Known for its strength and precision, perfect for removing acrylics.
- Diamond: Offers a smooth finish and is great for detailed work.
- Ceramic: Less heat buildup, making it ideal for sensitive nails.
Each material has its own pros and cons, so it’s essential to match the bit material to the task at hand.
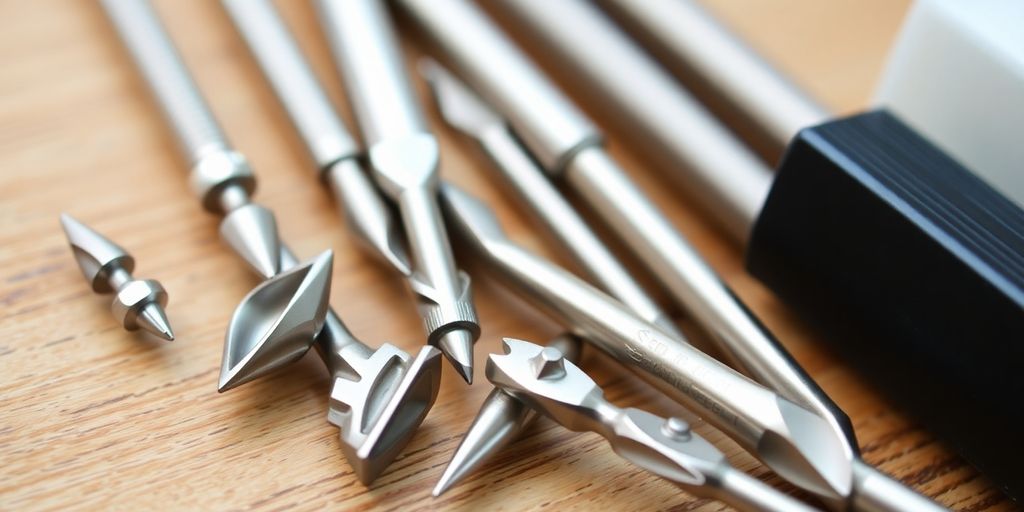
Different Shapes and Sizes
Nail drill bits come in a variety of shapes and sizes, each designed for specific tasks:
- Barrel/Cylinder: Great for surface work and backfill cutting.
- Cone: Ideal for reaching under the nails and sidewalls.
- Ball Top: Used for cleaning up cuticles and hard skin.
Choosing the right shape and size can significantly improve your nail care routine, making it more efficient and effective.
If you’re looking to buy nail drill bits that cater to your specific needs, consider exploring the diverse range available, from high-quality diamond bits to versatile carbide options. With the right drill bits, you can achieve salon-quality results at home.
Choosing the Right Drill Bit
Identifying Your Needs
When it comes to picking the perfect nail drill bit, the first step is to identify your specific needs. Are you focusing on shaping, smoothing, or removing gel polish? Each task might require a different bit. For instance, if you’re working on natural nails, you might want to start with a fine grit bit to avoid causing any damage. On the other hand, tackling gel or acrylic nails might need something more robust, like a medium or coarse grit bit.
Matching Bits to Tasks
Once you know what you need, it’s all about matching the right bit to the task at hand. Here’s a quick guide to help you out:
- Cuticle Care: Use a cuticle care drill bit with a super-fine tip to gently clean around the nails.
- Gel Polish Removal: A tungsten carbide bit is ideal for efficiently filing off the top layer of gel polish.
- Acrylic/Gel Builder Removal: For this, a more aggressive bit is necessary, something that can handle the tough job of removing acrylic or gel builders.
For those looking to explore a range of high-quality diamond nail drill bits, there are options designed for both delicate treatments and more challenging tasks.
Consulting with Professionals
Sometimes, the best way to choose the right drill bit is by consulting with professionals. They can offer insights based on experience, helping you avoid common pitfalls. Whether you’re a beginner or an experienced nail technician, professional advice can be invaluable. Plus, many companies, like Lena Bits Corporation, provide resources and guides on nail drill bit safety and maintenance, which can be a great help in making informed decisions.
Picking the right nail drill bit isn’t just about the tools; it’s about understanding the task and choosing accordingly. With the right bit, you’ll not only make your work easier but also ensure the health and beauty of the nails you’re working on.
Preparing Your Nails for Drilling
Removing Old Polish
Before you start anything, get rid of that old nail polish. Old polish can mess up your new look, so it’s gotta go. Grab some acetone and cotton balls, and really scrub those nails. Make sure there’s no leftover color hanging around. This step is super important because it gives you a clean slate to work with.
Trimming and Shaping
Once your nails are polish-free, it’s time to trim them down to your preferred length. Use a good pair of nail clippers for this. After trimming, shape your nails with a file. You can go for square, round, or whatever shape you like. Just make sure you’re not too rough, as this can weaken your nails. A gentle touch is all you need.
Sanitizing Your Hands
Now that your nails are looking neat, it’s crucial to sanitize your hands. Wash them with antibacterial soap and water to get rid of any germs. Pay extra attention to your nails and cuticles. This not only keeps your nails healthy but also preps them for the next steps. You might also want to use a bit of hand sanitizer for extra cleanliness.
Taking the time to prepare your nails properly makes all the difference. It sets the stage for a flawless manicure and keeps your nails healthy in the long run. Think of this as the foundation for your nail art masterpiece.
For those looking for a versatile tool, EK02 Silicone Polisher Nail Drill Bits are a great choice. They’re perfect for matting and pre-polishing, making them ideal for both natural and artificial nails.
Using Nail Drill Bits Safely
Starting with Low Speed
When you’re just getting started with a nail drill, it’s all about taking it slow. Starting with a low speed is crucial. You want to get a feel for how the drill operates and how it interacts with your nails. Begin with the lowest speed setting, usually under 5,000 RPM. This lets you understand the vibration and sound without overwhelming yourself or risking damage to your nails.
Applying Light Pressure
Gentle is the name of the game here. Let the drill do the work for you. Applying light pressure ensures that you’re not overworking the nail or causing unnecessary harm. The drill’s rotation should be enough to file and shape without you having to push hard. This is especially important when dealing with natural nails, which can be more delicate than acrylic or gel.
Monitoring Heat Levels
Heat can build up quickly when using a nail drill, and that’s something you want to keep an eye on. If you’re not careful, excessive heat can damage the nail bed and cause discomfort. Always be mindful of how warm the bit is getting. If you notice it getting too hot, take a break and let it cool down before continuing. This not only protects your nails but also helps in maintaining the high-quality carbide nail drill bits you might be using.
Types of Nail Drill Bits
Cuticle Care Drill Bit
When it comes to keeping your cuticles neat and tidy, the Cuticle Care Drill Bit is your best friend. It’s designed with a super-fine tip that lets you get up close and personal with the cuticle area, ensuring a clean and healthy surface without damaging the skin. This bit is a must-have for anyone serious about nail care.
Gel Polish Removal Drill Bit
If you’re tired of spending ages soaking off gel polish, the Gel Polish Removal Drill Bit is a game-changer. Made from tungsten carbide, this bit is designed to file off the top layer of gel polish quickly, making the soaking process much faster. It’s an essential tool for both professionals and DIY enthusiasts who frequently work with gel nails.
Acrylic/Gel Builder Removal Drill Bit
For those dealing with acrylic or gel builder layers, this drill bit is a powerhouse. Known for its aggressive nature, the Acrylic/Gel Builder Removal Drill Bit efficiently removes these tough layers without much hassle. It’s perfect for smoothing out bumps or removing any unwanted material on the nails, making it a staple in any nail technician’s toolkit.
Nail drill bits are not just about functionality; they also need to be handled with care to ensure longevity and performance. Regular cleaning and proper storage are key to maintaining their effectiveness.
Cleaning and Maintaining Your Drill Bits
Disinfecting After Use
Keeping your nail drill bits clean is a must if you want them to last. After each use, it’s important to disinfect the bits to stop any bacteria from building up. First, brush off any dust and debris. Then, soak them in rubbing alcohol or an antibacterial solution for a few minutes. Let them air dry completely before you store them or use them again.
Proper Storage Techniques
Once your drill bits are clean, storing them properly is the next step. Always unplug your nail drill before you start taking it apart to clean. Keep the handpieces, chargers, bits, and guards in a protective case or bag. Make sure they’re in a cool, dry place where they won’t get damaged or dirty.
Replacing Worn Parts
Over time, your nail drill bits and other parts will wear out. It’s a good idea to check your tools regularly for signs of wear. Buffing bands and accessories can get worn down from friction. If you notice any warped, bent, or cracked parts, replace them. Also, check that the motor runs smoothly and the charging functions are working properly. Replace any faulty electrical parts quickly to keep things running smoothly.
Taking care of your nail drill bits not only extends their life but also ensures you get the best results every time you use them. A little maintenance goes a long way in keeping your tools in top shape.
Techniques for Filing Natural Nails

Selecting the Right Grit
When it comes to filing natural nails, choosing the right grit is super important. Fine-grit sanding bands or diamond bits are your best friends here. They’re gentle enough to shape your nails without causing damage. Coarse bits are a no-go—they’re too harsh and can end up thinning your nails over time. If you’re new to this, a fine bit will keep things safe and sound.
Working Gently
Natural nails are delicate, so you gotta be gentle. Let the drill do its thing—don’t press down hard. Light pressure is key. This way, you avoid cracking or chipping your nails. The drill’s rotation should handle most of the work, so you don’t need to go all in with force. Just guide it smoothly over your nails.
Following the Natural Shape
Your nails have their own shape, and it’s best to stick with it. File along the natural curve for a strong, uniform look. You don’t want to go side-to-side aggressively—that can weaken your nails. Instead, use the drill’s spinning motion to contour along the natural lines. This keeps your nails looking neat and healthy.
Taking the time to file your natural nails with care can make all the difference. It’s not just about looks; it’s about keeping your nails strong and healthy. Patience is your best tool here.
Filing Gel and Acrylic Nails
Removing Gel Polish
Getting rid of gel polish can be tricky if you don’t know the right steps. Start with a coarse-grit sanding band or a flame-shaped carbide bit. Glide the nail drill from the cuticle to the tip. Avoid staying in one spot too long because that can cause heat buildup, which is uncomfortable. Once most of the polish is off, you can soak away the rest.
Thinning Gel Layers
After you’ve removed the color, use a medium-grit sanding band to thin out the gel layers. This helps smooth out any bumps or ridges. Let the drill do most of the work; don’t press down too hard. Keep the bit moving to avoid overheating.
Avoiding Overfilling
Gel nails are pretty flexible, so you don’t need to go heavy on the filing. The drill bit should glide over the nail, shaping it gently. Too much pressure can crack the gel or cause it to lift. Always keep an eye on the temperature, as heat can mess with the gel’s bonds.
Filing gel and acrylic nails doesn’t have to be a daunting task. With the right techniques and tools, like the Nail Drill Bit B28 or the Nail Drill Bit B12, you can achieve salon-quality results at home. Just remember to take your time and be gentle with your nails.
Troubleshooting Common Issues
Dealing with Overheating
Ever felt your nail drill getting a bit too hot? It’s a common hiccup. Overheating can cause discomfort or even damage your nails. Usually, it’s due to staying in one spot for too long or pressing down too hard. To avoid this, keep the drill moving and apply just enough pressure. If it still heats up, maybe it’s time to check your drill bits—they might be worn out.
Identifying Worn Bits
Using worn-out bits is like trying to cut with a dull knife—not effective and kind of dangerous. Worn bits don’t just reduce efficiency; they can also cause nail damage. Keep an eye out for signs like reduced performance or visible wear and tear. Regularly inspecting and replacing bits can save you a lot of trouble.
Adjusting Speed and Pressure
Finding the right balance between speed and pressure is key. High speed with too much pressure can harm your nails, while too little can be ineffective. Start slow and gradually increase speed if needed. Use light, consistent pressure. If you’re unsure, consulting a professional can help you nail it—pun intended!
Remember, patience and practice are your best friends. Mistakes happen, but with time, you’ll get the hang of it. Keep experimenting until you find what works best for you.
Enhancing Your Nail Art Skills

Using Drill Bits for Nail Art
Getting creative with nail art is a fun way to express yourself. With the right nail drill bits, you can create intricate designs that are sure to impress. The key is to start simple. Begin by practicing basic shapes and lines on a piece of paper or a practice nail. Once you’re comfortable, try using a fine drill bit to etch delicate patterns onto your nails. This technique can add a unique flair to your manicure that traditional nail polish can’t achieve.
Creating Unique Designs
When it comes to nail art, the possibilities are endless. You can experiment with different textures and finishes by using various types of drill bits. For instance, a carbide drill bit is perfect for creating a smooth surface, while a diamond bit can add a bit of sparkle. Don’t be afraid to mix and match different techniques to see what works best for you. If you’re looking for high-quality drill bits, consider exploring a range of options that cater to both acrylic and natural nails.
Practicing on Fake Nails
Before you dive into creating designs on your own nails, it’s a good idea to practice on fake nails. This allows you to experiment without the pressure of making mistakes on your own hands. Set up a small practice area where you can test out different designs and techniques. Over time, you’ll gain confidence and skill, making it easier to transfer your designs to your own nails. For those interested in expanding their toolkit, the Carbide Nail File Drill is a great choice for both beginners and seasoned nail artists alike.
Experimentation is the heart of nail art. Don’t be afraid to try new things and push the boundaries of your creativity. The more you practice, the more your skills will grow, and soon you’ll be creating nail art that turns heads wherever you go.
Exploring Advanced Techniques
Special Cases for Nail Drills
Nail drills aren’t just for manicures and pedicures. They can be used in a variety of special cases. For instance, some professionals use them for intricate nail art designs, thanks to their precision and versatility. If you’re into creating unique nail art, consider experimenting with different milling cutter bits to find the perfect fit for your style. Also, nail drills can assist in smoothing out rough surfaces, making them a handy tool for more than just nails.
Using Drills for Pet Grooming
Surprisingly, nail drills can also be a game-changer in pet grooming. They offer a gentle way to trim and shape your pet’s nails without the harshness of traditional clippers. Using a nail drill for pets requires extra caution—start at a low speed and gradually increase as needed. Be sure to use bits that are specifically designed for pets to ensure their comfort and safety. This technique can make nail grooming less stressful for your furry friends.
Innovative Applications in Woodworking
Beyond beauty and pet care, nail drills have found their place in woodworking. They are excellent for detailed carvings and intricate designs. The precision of a nail drill allows for fine control, which is essential when working with wood. Consider using diamond nail drill bits for their durability and ability to handle tough materials. Whether you’re a hobbyist or a professional, incorporating a nail drill into your woodworking toolkit can open up new possibilities for creativity.
Exploring the unconventional uses of nail drills can broaden your skills and reveal unexpected applications. Whether you’re crafting a new nail design, grooming your pet, or working on a woodworking project, these versatile tools can help you achieve impressive results.
Dive into the world of advanced nail art techniques! Whether you’re a beginner or a pro, there’s always something new to learn. Visit our website to discover tips, tricks, and products that can elevate your nail game. Don’t miss out on the fun!
Wrapping It Up: Your Nail Drill Adventure
So there you have it! Prepping your nails with the right drill bit doesn’t have to be rocket science. With a bit of practice and the right tools, you can achieve salon-quality nails right at home. Remember, it’s all about choosing the right bit for the job and taking your time to get the hang of it. Start slow, be gentle, and soon enough, you’ll be a pro. And hey, don’t forget to keep those bits clean and well-maintained for the best results. Happy drilling, and may your nails always look fabulous!
Frequently Asked Questions
What exactly is a nail drill bit?
A nail drill bit is a tool used with an electric nail drill to shape, smooth, and remove nail polish. They come in different shapes and materials for various nail tasks.
How do I choose the right nail drill bit for my needs?
Consider the task you need to do, like shaping or polishing. Different bits are designed for specific jobs, so match the bit to your task.
Can using a nail drill damage my nails?
If used correctly, a nail drill won’t harm your nails. It’s important to use the right speed and pressure to avoid any damage.
How should I clean my nail drill bits?
You can clean them by soaking in a disinfectant solution and allowing them to air dry. Regular cleaning keeps them safe and effective.
What’s the best way to start using a nail drill as a beginner?
Start with a low speed to get used to the vibration and sound. Practice on fake nails first to build confidence.
Why is it important to monitor heat levels when using a nail drill?
High heat can damage your nails and cause discomfort. Keeping an eye on heat levels helps prevent this.
How often should I replace my nail drill bits?
Replace them when they show signs of wear, like dullness or chipping, to ensure they work effectively.
Can I use nail drill bits for anything other than nails?
Yes, some people use them for pet grooming or even woodworking, but it’s important to use the right bit for each task.