Keeping your nail drill bits in top shape is key for anyone serious about nail care. Over time, these bits can get clogged with dust and debris, which can affect their performance. Regular cleaning and proper maintenance ensure they last longer and work better. In this guide, we’ll walk you through everything you need to know to keep your nail drill bits clean and ready for action.
Key Takeaways
- Regular cleaning of nail drill bits prevents debris buildup and extends their lifespan.
- Using the right disinfectants is crucial for maintaining hygiene and safety.
- Proper storage solutions help avoid contamination and damage.
- Inspecting your bits regularly can catch wear and tear early, ensuring optimal performance.
- Advanced cleaning techniques, like ultrasonic cleaners, can tackle tough residue effectively.
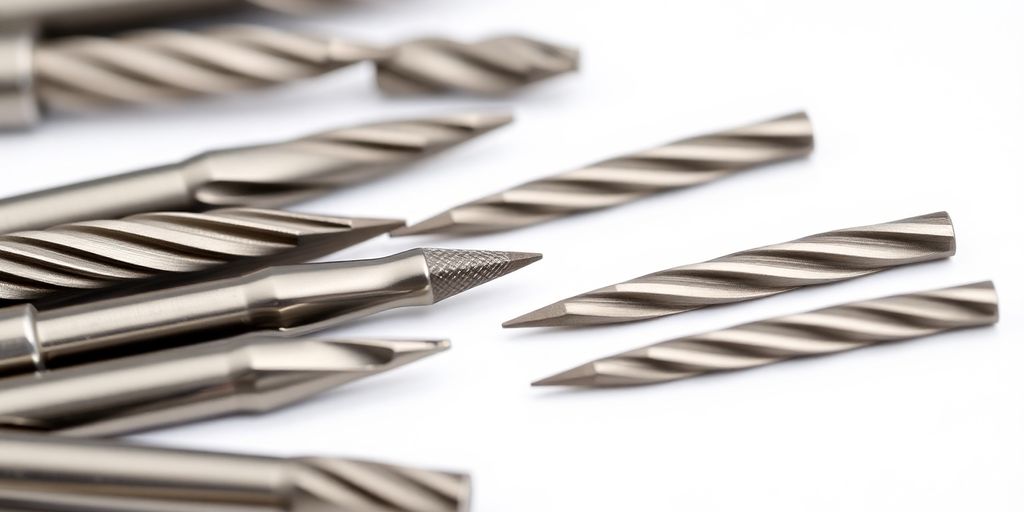
Understanding Nail Drill Bits

Types of Nail Drill Bits
When you’re diving into nail care, it’s essential to know the different types of nail drill bits available. There are several types, each serving a unique purpose:
- Carbide Bits: These are robust and long-lasting, perfect for removing acrylics and hard gels. Lena Bits Corporation offers some high-quality options.
- Diamond Bits: Known for their precision, these are excellent for refining and smoothing. They’re ideal for both natural and artificial nails. Explore diamond nail drill bits to find the right fit for your needs.
- Ceramic Bits: These bits are great for beginners because they generate less heat, making them safe for natural nails.
- Mandrels with Sanding Bands: These are versatile and disposable, used for surface work and shortening.
Choosing the Right Bit for Your Needs
Selecting the appropriate nail drill bit depends on what you plan to do. If you’re working on acrylic nails, carbide bits are your go-to due to their durability. For precision work on natural nails, diamond bits are the best choice. Ceramic bits are perfect if you’re just starting or if you have sensitive nails, as they are gentle and produce less friction.
Common Uses for Nail Drill Bits
Nail drill bits are incredibly versatile tools in nail care. Here are some common uses:
- Shaping and Sculpting: Use carbide bits for shaping acrylic or gel nails.
- Smoothing and Refining: Diamond bits are perfect for smoothing out any rough edges or surfaces.
- Removing Gel Polish: Ceramic bits are gentle yet effective for removing gel polish without damaging the natural nail.
Nail drill bits are essential for achieving a professional finish, whether you’re a seasoned pro or just starting out. They not only make the process quicker but also ensure precision and safety.
Essential Cleaning Supplies
Gathering Your Cleaning Tools
Before you start cleaning your nail drill bits, make sure you have all the right tools on hand. You don’t want to be halfway through and realize you’re missing something important! Here’s a quick list of what you’ll need:
- A small brush, like a toothbrush or a specialized nail brush, for scrubbing away debris.
- A bowl or small container for soaking the bits.
- A soft, lint-free cloth for drying.
- Optional: An ultrasonic cleaner for a deeper clean.
Having these tools ready will make the process smoother and more efficient.
Choosing the Right Disinfectant
Disinfecting your nail drill bits is a crucial step in maintaining hygiene. When picking a disinfectant, look for products that are specifically designed for metal tools. Barbicide is a popular choice among professionals, but there are many options available. Consider whether you prefer a concentrate that you mix with water or a ready-to-use formula. Each type has its own advantages, so choose based on convenience and cost.
Preparing Your Workspace
Setting up a clean workspace is just as important as having the right tools. Make sure your area is free from clutter and dust. Lay down a towel or a mat to protect your surfaces from any spills or splashes. It’s a good idea to have a dedicated area for cleaning your tools, so everything is in one place and easy to find.
Keeping your workspace organized not only makes the cleaning process easier but also helps prevent cross-contamination.
Step-by-Step Cleaning Process

Cleaning your nail drill bits is crucial for keeping them in tip-top shape and ensuring a safe manicure or pedicure. Let’s walk through the steps to make sure those bits stay clean and functional.
Washing Nail Drill Bits
First things first, you need to wash those bits. Start with some soapy water—I find that a mild dish soap works wonders. Get yourself a brass brush to scrub away any dust and debris. If you’re dealing with stubborn residue, consider using an ultrasonic cleaner. Just remember, don’t add disinfectant to the ultrasonic cleaner; it’s just for getting rid of gunk.
Disinfecting Techniques
Once your bits are squeaky clean, it’s time to disinfect. This step is all about killing any lingering bacteria. You can use a ready-to-use disinfectant or mix a concentrate with water. Make sure to follow the instructions on the product for the correct "kill time." For instance, some solutions might need a soak of a few minutes, while others work in under a minute.
Drying Your Nail Drill Bits
After disinfecting, drying is key. Lay your bits out on a clean, dry surface, like a dishwashing mat, and let them air dry. Spread them out so they aren’t touching each other—this prevents any rust or oxidation. You want them completely dry before storing them away.
Keeping your nail drill bits clean isn’t just about hygiene; it’s about maintaining their performance and extending their lifespan. A little effort goes a long way in ensuring your tools are always ready for the next client or project.
Post-Cleaning Maintenance

Once you’ve cleaned your nail drill bits, it’s time to make sure they’re in top shape for the next use. Here’s how you can maintain them properly:
Inspecting for Damage
After cleaning, give your bits a good look-over. Check for any signs of wear, like chips or dull edges. Using damaged bits can lead to poor performance or even injury. If you notice any issues, it’s better to replace them sooner rather than later.
Sharpening Techniques
Keeping your bits sharp is key for efficient work. Some bits can be sharpened, while others, like certain diamond nail drill bits, might need replacement once they’re worn out. If you’re not sure how to sharpen them, consider seeking help from a professional service or checking out tutorials online.
When to Replace Your Bits
Even with the best care, all bits have a lifespan. If you notice that your bits aren’t cutting as well as they used to, or if they’re causing discomfort, it might be time for new ones. Investing in quality bits, like those made for gel and acrylic nails, can make a big difference in performance and longevity.
Regular maintenance isn’t just about keeping tools in good condition; it’s about ensuring safe and effective nail care for you and your clients. By taking the time to inspect, sharpen, and replace your drill bits as needed, you’re investing in a smoother, more professional nail service.
Proper Storage Solutions
Best Practices for Storing Nail Drill Bits
Alright, so you’ve cleaned your nail drill bits, and now you’re wondering how to store them properly. Proper storage is key to keeping your bits in top shape. First off, you need a designated container just for your bits. This keeps them safe from getting knocked around or scratched by other tools. Consider a bit holder or a small box specifically for nail bits. Make sure it’s clean and free from any debris before you put your bits in there. It’s also a good idea to keep your storage container in a dry place to prevent any moisture from creeping in and causing rust.
Organizing Your Nail Tools
Now, let’s talk organization. Keeping your nail tools organized not only helps you find what you need quickly but also extends the life of your tools. You might want to sort your bits by type or size, especially if you have a variety of carbide nail drill bits for different uses. You can use a small drawer system or a tackle box with compartments to keep everything neat. Labeling each section can save you a lot of time and hassle when you’re in the middle of a manicure or pedicure session.
Avoiding Contamination
Finally, let’s tackle contamination. You definitely don’t want your freshly cleaned bits getting dirty again. Avoid storing them with other tools that might be dirty or have residue on them. It’s also smart to keep them away from any liquids or chemicals that might spill. If you’re using a shared space, make sure everyone knows the importance of keeping the bit storage area clean. A little extra care in how you store your bits can make a huge difference in their performance and longevity.
Proper storage isn’t just about keeping things tidy. It’s about maintaining the quality and performance of your nail drill bits for the long haul. Think of it as giving your tools the respect they deserve.
Tips for Long-Term Care
Regular Cleaning Schedule
Keeping your nail drill bits clean is a must if you want them to last. Set up a regular cleaning schedule based on how often you use them. If you’re using them daily, consider cleaning them at least once a week. Consistency is key to preventing buildup that can dull your bits and affect performance.
Signs of Wear and Tear
Even the best bits will wear out eventually. Look for signs like dull edges, chips, or unusual vibrations during use. These are indicators that your bits might need some attention. Regularly checking your tools can save you from unexpected surprises during a manicure session.
Extending the Life of Your Bits
To get the most out of your nail drill bits, handle them with care. Avoid dropping them and keep them away from moisture. Store them in a clean, dry place, ideally in a dedicated container to avoid any accidental damage. Proper storage can significantly extend their lifespan and keep them performing at their best.
Taking care of your nail drill bits not only saves you money in the long run but also ensures that you are offering the best service to your clients. By maintaining your tools, you’re also maintaining your reputation as a professional.
Troubleshooting Common Issues
Identifying Performance Problems
Sometimes, your nail drill bits might not perform as expected. Common signs include reduced efficiency in filing or a bit that feels "off" during use. This could be due to clogging from product buildup, especially if you frequently use gel or acrylics. Bits can get clogged with uncured gel or acrylic dust, which can make them less effective. Regular cleaning can help, but if issues persist, it might be time to look deeper.
Fixing Common Bit Issues
Here are a few steps to troubleshoot common issues:
- Check for Clogs: Remove the bit and inspect it for any visible debris or material buildup.
- Clean Thoroughly: Use a brush to clean the grooves of the bit, ensuring all dust is removed. If needed, soak in a suitable cleaner.
- Inspect for Damage: Look for any signs of wear or damage. A damaged bit can affect performance and should be replaced.
When to Seek Professional Help
If your bits are still not performing well after cleaning and inspection, it might be time to consult a professional. They can help identify if the issue is with the bits themselves or possibly the drill machine. Remember, using high-quality bits, like diamond nail drill bits, can minimize these issues and enhance your nail care routine.
Keeping your nail drill bits in top condition is essential for a seamless nail care experience. Regular maintenance and timely troubleshooting can extend the life of your tools and ensure optimal performance.
Understanding the Importance of Hygiene
Preventing Infections
Keeping your nail drill bits squeaky clean isn’t just about appearances. It’s essential for stopping infections in their tracks. When bits aren’t properly cleaned, they can become a breeding ground for bacteria and fungi. Think about it: these bits come into contact with skin, nails, and sometimes blood. That’s why regular cleaning and disinfecting post-use is non-negotiable. It’s like washing your hands after using the bathroom—just a basic hygiene must-do.
Maintaining Client Safety
Your clients trust you with their hands, and that’s a big deal. Ensuring that your tools, especially your high-quality carbide nail drill bits from Lena Bits, are clean and sanitary helps maintain that trust. Clean bits mean less chance of spreading infections from one client to another. It’s not just about keeping them safe; it’s about showing them you care about their well-being.
Building Trust with Clients
A good reputation is built on trust, and trust is built on reliability and safety. When clients see you taking the time to clean and disinfect your tools, it reassures them that you’re professional and conscientious. Plus, it’s a great talking point to explain the process while they’re in the chair. They’ll appreciate the transparency and might even pass on a good word to their friends. Using products like LenaBits that are known for their durability and reliability can also bolster your reputation as a top-notch nail tech.
Consistently clean tools reflect a commitment to quality service and client care. It’s a simple step that goes a long way in establishing a trustworthy and professional image.
Exploring Advanced Cleaning Techniques
Cleaning your nail drill bits doesn’t have to be a chore. With some advanced techniques, you can make the process more effective and even enjoyable. Let’s dive into some methods that can really get those bits sparkling.
Ultrasonic Cleaners
Ultrasonic cleaners are like the magic wands of cleaning. They use high-frequency sound waves to create tiny bubbles in a cleaning solution, which gently scrub away dirt and debris from your drill bits. Here’s why you might want to consider using one:
- Efficient Cleaning: Ultrasonic cleaners can reach all the nooks and crannies of your bits, ensuring a thorough clean.
- Time-Saving: Pop your bits in, turn it on, and let it do the work while you handle other tasks.
- Gentle on Tools: Despite their power, these cleaners are gentle enough not to damage your bits.
Using Steam for Disinfection
Steam cleaning is another fantastic way to disinfect your nail drill bits. The high temperature of steam can kill bacteria and viruses without the need for harsh chemicals. Here’s how you can use steam effectively:
- Fill your steam cleaner with water and let it heat up.
- Place your drill bits in the designated area.
- Let the steam work its magic for a few minutes.
Steam is a natural disinfectant, making it an eco-friendly choice for those conscious about using fewer chemicals.
Chemical Solutions for Tough Residue
Sometimes, regular cleaning just won’t cut it, especially if there’s stubborn residue stuck on your bits. Chemical solutions can help break down these tough spots. When using chemicals, keep these tips in mind:
- Always read the instructions carefully to ensure safe use.
- Use a well-ventilated area to avoid inhaling fumes.
- Wear gloves to protect your skin from harsh chemicals.
Remember: Regular cleaning is key to maintaining your nail drill bits, but advanced techniques can help when you need that extra power. Keep experimenting to find what works best for your toolkit.
By incorporating these advanced cleaning techniques, you’ll not only extend the life of your nail drill bits but also ensure they perform at their best. Whether it’s using an ultrasonic cleaner, steam, or chemical solutions, each method has its own benefits. So, give them a try and see which one fits your routine best.
If you’re looking to keep your space spotless, dive into the world of advanced cleaning methods! These techniques can make your cleaning routine easier and more effective. Want to learn more? Visit our website for tips and tools that can help you achieve a cleaner home!
Conclusion
So there you have it, folks! Keeping your nail drill bits clean and well-maintained isn’t rocket science, but it’s super important if you want them to last. Just remember to give them a good clean after each use, dry them properly, and store them in a safe spot. It’s like giving your tools a little TLC, and in return, they’ll work like a charm every time. Plus, you’ll keep things hygienic for yourself and anyone else you might be working on. So go ahead, keep those bits sparkling, and enjoy your nail art adventures!
Frequently Asked Questions
How often should I clean my nail drill bits?
It’s best to clean your nail drill bits after each use. This keeps them in good shape and prevents germs from spreading.
What supplies do I need to clean nail drill bits?
You’ll need a soft brush, soapy water, and a disinfectant like acetone or alcohol. A drying mat and storage container are also helpful.
Can I use regular soap to clean drill bits?
Yes, regular dish soap with warm water works well for cleaning. Just make sure to rinse and dry the bits thoroughly.
How do I know when to replace my drill bits?
Replace your drill bits if they show signs of wear, like dullness or damage, or if they’re not working as well as before.
Is it safe to use acetone on nail drill bits?
Yes, acetone is safe for disinfecting nail drill bits. Just don’t soak them for too long, as it can cause rusting.
What should I do if my drill bit gets stuck?
If a drill bit gets stuck, try gently twisting and pulling it out. If it doesn’t budge, it might be time to replace the bit.
How can I prevent my nail drill bits from rusting?
To prevent rust, dry your drill bits completely after cleaning and store them in a dry place away from moisture.
Why is it important to disinfect nail drill bits?
Disinfecting prevents the spread of germs and keeps your tools safe for use on different clients.