Ever found yourself staring at a wall of nail drill bits, wondering what on earth they all do? You’re not alone. Nail drill bits, those handy little tools that attach to an electric nail drill, can make or break your nail game. They’re essential for shaping, smoothing, and cleaning up both natural and artificial nails. But with so many types out there—carbide, diamond, ceramic—it’s easy to feel overwhelmed. Don’t worry, though. We’re breaking it all down for you, from the different types of bits to how to choose the right one for your needs.
Key Takeaways
- Nail drill bits are crucial tools for both professional and home nail care.
- There are several types of bits, each serving a unique purpose.
- Choosing the right bit depends on the task and material of the nail.
- Safety is key—proper handling and knowledge are necessary to avoid injury.
- Regular care and maintenance extend the life of your nail drill bits.
Understanding Nail Drill Bits

What Are Nail Drill Bits?
Nail drill bits are the small, interchangeable tips that attach to an electric nail drill. They come in various shapes, sizes, and materials, each designed for specific tasks like filing, shaping, and removing nail enhancements. These bits make nail care more efficient and precise, catering to both professional salons and DIY enthusiasts.
How Do Nail Drill Bits Work?
Nail drill bits work by rotating at high speeds, allowing them to file down or smooth out nail surfaces with ease. They fit into an e-file, which is essentially a powered rotary tool. By selecting the right bit, you can perform tasks like removing gel polish, refining acrylics, or prepping natural nails without much effort. This precision is what makes them indispensable in nail care.
Why Are Nail Drill Bits Essential?
Having the right nail drill bit can make a big difference in your nail care routine. They help in achieving professional results, whether you’re a seasoned nail tech or just someone who enjoys doing their nails at home. The variety of bits available means you can tackle any nail task efficiently, from smoothing to shaping. Plus, when you buy nail drill bits, you’re investing in tools that can significantly reduce the time and effort needed for nail maintenance.
Nail drill bits are not just about convenience; they are about achieving the perfect finish with minimal hassle. Choosing the right bit can transform your nail care experience, making it easier and more enjoyable.
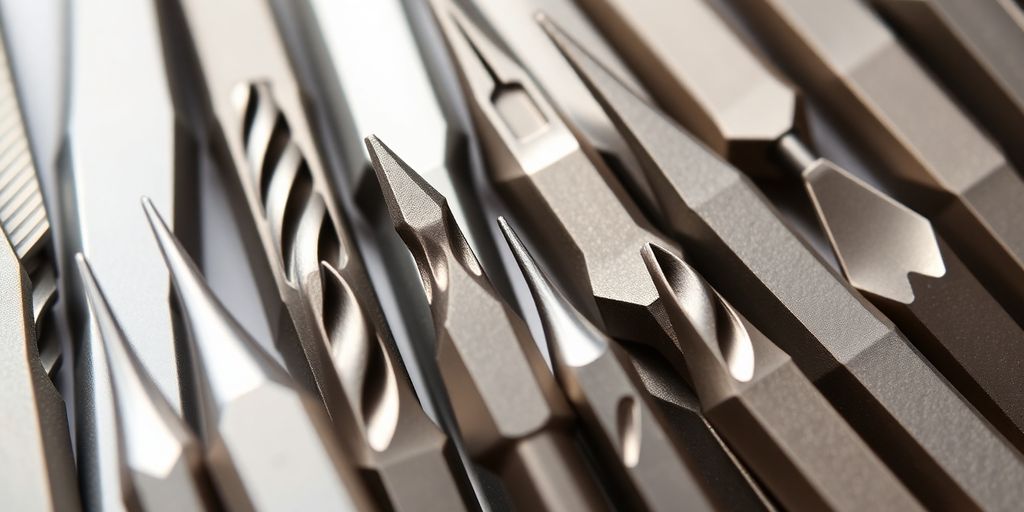
Types of Nail Drill Bits
Carbide Bits Explained
Carbide bits are like the workhorses of nail drilling. They’re made from carbide metal, which means they’re super durable and long-lasting. These bits have flute-like cuts that help shave off nail products like acrylics with ease. The size of these flutes determines the grit—larger cuts mean a coarser grit, while smaller cuts are finer. Carbide bits are excellent for advanced users who need to remove tough materials efficiently. They can be cleaned and reused, which makes them a favorite for many professionals. If you’re looking for high-quality options, you might want to explore durable carbide nail drill bits that offer precision and longevity.
Diamond Bits Overview
Diamond bits, as the name suggests, are made with real diamonds. They work by scratching or exfoliating the surface rather than cutting through it. This makes them perfect for dry manicures and cuticle work. They’re incredibly tough and can last a long time if properly cared for. However, be cautious—some "diamond" bits might actually be made from glass or other synthetic materials, so always check the quality before buying. These bits are ideal for detailed work and are often used for refining and finishing tasks.
Ceramic Bits Benefits
Ceramic bits are another popular choice among nail technicians. They have a similar design to carbide bits with fluted teeth, but the ceramic coating helps reduce heat buildup. This makes them more comfortable to use over extended periods, as they don’t get as hot. Ceramic bits are also easy to clean and sterilize, making them a hygienic option. They’re great for both beginners and pros who want to maintain a steady pace without worrying about overheating. Plus, their unique composition makes them less likely to cause friction burns, which is a big plus for sensitive clients.
Choosing the Right Nail Drill Bit
Factors to Consider
When you’re picking out nail drill bits, there’s a bunch of stuff to think about. First up, the material is key. You’ve got carbide, diamond, and ceramic, each with its own perks. Carbide bits are tough and perfect for removing gel and acrylic. Diamond bits are great for precision work, and ceramic bits are awesome because they create less heat, making them comfy to use.
Next, you gotta think about the grit size. Coarse grits are great for heavy-duty tasks like removing acrylics, while finer grits are better for smoothing and shaping. And don’t forget about the shape! Different shapes like barrels, cones, and balls are designed for specific tasks.
Matching Bits to Tasks
Choosing the right bit isn’t just about the material or grit. It’s about what you’re doing. If you’re prepping natural nails, a fine grit is your best friend. For removing acrylics, a coarse carbide bit will do the trick. And if you’re smoothing out the surface, a medium grit is usually ideal. Here’s a quick list to help match bits to tasks:
- Prepping Natural Nails: Fine grit, usually in a cone or ball shape.
- Removing Acrylics: Coarse carbide bit, often in a barrel shape.
- Smoothing and Shaping: Medium grit, flat-end cylinder or safety bit.
Common Mistakes to Avoid
Even the pros can mess up sometimes. One big mistake is using the wrong grit size for the job. Using a coarse bit on natural nails can cause damage. Another common error is not replacing worn-out bits. Old bits can be dangerous and less effective. Also, make sure your drill bit is compatible with your e-file. Most professional files use a 3/32” shank size, so double-check before you buy.
Choosing the right nail drill bit can save you time and effort, making your manicure or pedicure process smoother and more efficient. Remember, the right tool makes all the difference in achieving the perfect finish.
Using Nail Drill Bits Safely
Safety Tips for Beginners
Starting out with nail drill bits can be a bit daunting, but it’s all about practice and patience. Always start with a low speed setting to get a feel for the drill and bit combination. This not only helps in preventing accidental damage to your nails but also gives you more control. Remember, it’s better to go slow and steady rather than rush through the process. Also, make sure the bit is properly secured in the drill to avoid any wobbling or slipping.
Proper Handling Techniques
Handling your nail drill bits correctly is essential for both safety and achieving the best results. Hold the drill like a pencil, keeping a firm but relaxed grip. This helps in maintaining control and precision. It’s important to let the drill do the work—apply only gentle pressure. Overbearing force can lead to damage or discomfort. Additionally, keep your workspace tidy and free from clutter to avoid distractions.
Signs of Wear and Tear
Nail drill bits, like any tool, will wear out over time. Look for signs such as reduced effectiveness, visible wear on the bit’s surface, or any change in performance. If you notice any of these, it’s time to replace the bit. Regular inspection can help you catch these signs early. Bits used frequently, especially on tougher materials, may need replacing sooner. Keeping a schedule for checking your bits can help in maintaining their effectiveness and your safety.
Caring for Your Nail Drill Bits
Cleaning and Sanitizing
Keeping your nail drill bits clean is not just about hygiene; it’s about performance too. A clean bit works better and lasts longer. Start by soaking your bits in warm soapy water, giving them a gentle scrub with a brush to remove any debris. For metal bits, a quick dip in acetone for about 7-10 minutes can help dissolve stubborn residues. Remember, after cleaning, it’s crucial to disinfect them. Choose a liquid disinfectant, following the instructions carefully. Make sure not to soak them for too long, as it might damage the coating.
Storage Solutions
Once your bits are clean and sanitized, storing them properly is the next step. You want them organized and easy to access. Consider using a bit holder or display case, which not only keeps them in order but also prevents unnecessary wear and tear. Proper storage prolongs the life of your bits and keeps them looking neat and professional.
When to Replace Bits
Even with the best care, nail drill bits don’t last forever. Pay attention to signs of wear and tear. If a bit isn’t cutting as smoothly or efficiently as it used to, it’s time to replace it. Smaller bits might need replacing sooner due to their limited surface area. Generally, a bit can last anywhere from 150 to 300 services, but once they dull, they should be discarded. Remember, high-quality diamond nail drill bits are a great investment for both professionals and home users, ensuring precision and longevity.
Nail Drill Bit Shapes and Their Uses
Flame Bits for Precision
Flame bits are like the precision tools of the nail world. They’re perfect for creating an apex and cleaning around the cuticle area. Nail techs love them for their ability to get into those tight spots without damaging the surrounding skin. These bits are essential for detailed work and are commonly used in professional settings. If you’re looking to achieve that perfect finish, flame bits are your go-to.
Ball Bits for Cleaning
Ball bits might look simple, but they pack a punch when it comes to cleaning. They’re great for tidying up the sidewalls and the areas under your nails, making them a must-have for both manicures and pedicures. They’re also fantastic for prepping nails for backfills, ensuring a clean and smooth surface.
Safety Bits for Cuticles
Safety bits are designed with protection in mind. These bits are perfect for doing surface work and infill cuticle work, without the risk of cutting the skin. Ideal for beginners, safety bits help in backfill cutting and shortening nails. They’re a staple in any nail care toolkit, offering a safer alternative for those new to using nail drills.
When choosing the right nail drill bit, consider the task at hand. Each bit is designed for specific purposes, and using the right one can make a world of difference in the quality of your nail care routine. Whether you’re a professional or a DIY enthusiast, understanding these tools will enhance your nail game.
The Importance of Bit Material

Understanding Material Differences
When it comes to nail drill bits, the material is a big deal. Each type of material has its own perks and drawbacks, affecting how you use them and what they’re best for. Carbide bits, for example, are super tough and are great for removing acrylics. They’re made from a metal that’s about 20 times stronger than steel, so they last a long time and can be cleaned and reused. Ceramic bits, on the other hand, are known for staying cool and are perfect for beginners who might be worried about heat buildup. They also have fluted cuts like carbide bits, making them good for shaving down products. Then there are diamond bits, which are more about scratching or exfoliating the nail surface rather than shaving. They’re ideal for dry manicures and cuticle work. But watch out, not all diamond bits are made equal—some might be synthetic, so it’s worth checking the quality.
How Material Affects Performance
The material of your nail drill bit can totally change how it performs. If you’re using a carbide bit, you’re looking at a tool that’s going to handle tough jobs without breaking a sweat. It’s great for cutting through thick layers of acrylic or gel. Ceramic bits are more about finesse—they’re gentle on the nails and don’t heat up as much, which is a big plus if you’re working on natural nails. Diamond bits are all about precision. They’re perfect for detailed work like cleaning up cuticles or prepping the nail surface. The key is to match the bit material to the task at hand, so you’re not using a sledgehammer when you need a scalpel.
Choosing Quality Bits
Buying quality bits is like investing in good kitchen knives—they make the job easier and safer. Here are some tips to help you pick the right ones:
- Check the material: Make sure you’re getting the real deal. For example, true diamond bits should be made from natural diamond, not glass or crystal.
- Look for durability: High-quality bits should last a while, even with regular use. Carbide and ceramic bits are usually a safe bet.
- Consider your needs: Are you a pro or a DIY enthusiast? Your choice might differ based on how often you use them and what you’re comfortable with.
Investing in the right material for your nail drill bits can make a huge difference in your nail care routine. It’s not just about getting the job done—it’s about doing it well and safely.
For those interested in exploring a range of high-quality nail drill bits, there are options available that cater to both professional and personal use. Whether you’re looking for carbide or diamond bits, there’s something for every need. Additionally, if you’re keen on learning more about diamond nail drill bits, there are guides available to help you make the best choice for your manicure and pedicure needs.
Common Applications for Nail Drill Bits

Nail drill bits are essential tools in the world of nail care, offering versatility and precision. Whether you’re a professional nail technician or a DIY enthusiast, understanding their applications can enhance your nail game significantly.
Preparing Natural Nails
Before applying any nail enhancements, it’s crucial to prep the natural nails properly. Nail drill bits are perfect for this task. Use a fine-grit sanding band to gently remove the shine from the nail surface. This step ensures better adhesion for gel or acrylic applications. Proper preparation can make all the difference in the longevity of your manicure.
Removing Acrylics
Removing acrylics can be a daunting task without the right tools. Nail drill bits, particularly carbide bits, are designed to tackle this job efficiently. These bits can cut through the layers of acrylic without damaging the natural nail underneath. Start with a coarse grit to break down the bulk of the acrylic, then switch to a finer grit for more detailed work.
Smoothing and Shaping
Once the enhancements are applied, smoothing and shaping are the next steps. Diamond bits are ideal for this, as they offer precision and control. They can be used to refine the shape and smooth out any rough edges. For a flawless finish, follow up with a polishing bit to add shine.
Mastering the use of nail drill bits can transform your nail care routine, making it faster and more efficient. With the right bit, every task becomes easier, from prepping to finishing.
Troubleshooting Nail Drill Bit Issues

Identifying Common Problems
When you’re using nail drill bits, things can go wrong. Common problems include bits not cutting properly, wobbling, or even breaking. If your bit isn’t cutting well, it might be dull or clogged with nail dust. Bits that wobble could be due to a loose fit in the drill or a bent shank. Broken bits usually mean you’re applying too much pressure or using them incorrectly. Keep an eye out for these issues to maintain smooth operations.
Fixing Bit Misalignment
If your drill bit isn’t aligned, it can cause uneven filing and discomfort. Here’s how to fix it:
- Check the Fit: Ensure the bit is inserted correctly and tightly into the drill.
- Inspect the Shank: Look for any bends or damage that might cause misalignment.
- Test Run: Run the drill at a low speed to see if the bit spins smoothly.
Misalignment can often be resolved by simply adjusting the bit or replacing it if it’s damaged.
Dealing with Overheating
Overheating is a common issue that can damage both your nails and the bit itself. To prevent this:
- Use the Right Speed: Don’t run the drill too fast, especially on delicate nails.
- Apply Light Pressure: Heavy pressure increases friction and heat.
- Take Breaks: Let the bit cool down between uses.
Overheating not only affects the bit’s lifespan but can also cause discomfort during use. Always be mindful of the heat generated during filing.
For those seeking high-quality nail drill bits that minimize these issues, consider exploring options like the milling cutter bit from Lena Bits Corporation, which is designed for effective grinding and smoothing. Additionally, if you’re interested in precision and smooth finishes, high-quality diamond nail drill bits can be a great choice for both manicure and pedicure applications.
Innovations in Nail Drill Bit Technology
Latest Trends in Nail Drill Bits
In recent years, the nail drill bit industry has seen some exciting changes. Manufacturers are now focusing on creating bits that are more efficient and safer to use. For instance, companies are developing bits with improved heat dissipation to prevent overheating during use. This not only enhances user comfort but also prolongs the life of the bit. Another trend is the use of hybrid materials that combine the durability of carbide with the gentle touch of ceramic, offering a balanced performance for both professionals and DIY enthusiasts.
Future of Nail Drill Technology
Looking ahead, the future of nail drill technology seems promising. We can expect to see bits that are more customizable, allowing users to adjust the grit and shape according to specific needs. There’s also a push towards integrating smart technology, such as sensors that can detect the bit’s wear and alert the user when it’s time for a replacement. This kind of innovation not only makes the process more efficient but also adds an extra layer of safety.
Eco-Friendly Options
As sustainability becomes a priority, the nail drill industry is not left behind. Eco-friendly nail drill bits are gaining popularity. These bits are made from recycled materials or are designed to be more durable, reducing the need for frequent replacements. Some companies are even exploring biodegradable options, which could revolutionize how we think about nail care tools. This shift not only benefits the environment but also appeals to a growing number of environmentally-conscious consumers.
The evolution of nail drill bits is a testament to the industry’s commitment to innovation and sustainability. As technology advances, we can look forward to tools that not only enhance our nail care routines but also align with our values.
Nail Drill Bits for Professionals vs. Home Use
Differences in Quality
When it comes to nail drill bits, quality can vary significantly between those designed for professional use and those for home use. Professional bits are typically made from higher-grade materials, ensuring durability and precision. They are designed to withstand frequent use and maintain their sharpness over time. In contrast, home-use bits might not offer the same level of durability, often requiring more frequent replacement.
Choosing for Salon Use
For salon professionals, choosing the right nail drill bit is crucial to providing excellent service. High-quality bits, like those offered by Lena Bits Corporation, are essential for efficient and precise removal of excess product. These bits come in various shapes and sizes, allowing nail technicians to reach difficult areas and achieve a polished finish. Investing in professional-grade bits ensures longevity and performance, which is why they are favored in beauty salons.
Best Bits for DIY Enthusiasts
If you’re a DIY enthusiast, selecting the right nail drill bits can make your at-home manicure or pedicure much more enjoyable. Look for bits that are user-friendly and versatile, allowing you to perform a variety of tasks like shaping, smoothing, and removing old polish. Carbide bits, for instance, are a popular choice for their efficiency and ease of use. While you might not need the top-of-the-line options, investing in a decent quality set can still make a noticeable difference in your nail care routine.
Whether you’re a professional nail technician or just someone who loves doing their nails at home, understanding the differences in nail drill bits can help you make the best choice for your needs. Investing in the right tools can save you time and effort, ensuring your nails always look their best.
When it comes to nail drill bits, professionals and home users have different needs. Professionals often require high-quality, durable bits for frequent use, while home users might prefer more affordable options that are easy to handle. No matter your level, you can find the right tools for your nail care. Visit our website to explore a wide range of nail drill bits that suit both professional and home use!
Wrapping It Up
So, there you have it! E-file nail drill bits might seem a bit overwhelming at first, but once you get the hang of it, they can really change the way you do nails. Whether you’re a pro or just starting out, understanding the different bits and their uses can make your nail game so much stronger. Remember, practice makes perfect, and always prioritize safety. With the right tools and a bit of patience, you’ll be shaping and styling like a champ in no time. Happy filing!
Frequently Asked Questions
What is an e-file nail drill?
An e-file nail drill is an electric tool used to file nails or remove nail enhancements. It’s powered by a motor and uses different drill bits for various tasks.
Why should I use an e-file nail drill?
Using an e-file nail drill makes shaping and smoothing nails easier and faster than manual filing. It also helps in removing acrylics and buffing calluses.
What are the different types of nail drill bits?
Nail drill bits come in various materials such as carbide, diamond, and ceramic. Each type serves different purposes, like shaping, smoothing, or removing product buildup.
How do I choose the right nail drill bit?
Choosing the right bit depends on the task you need to perform. Consider the material, grit, and shape of the bit to match your specific needs.
Can beginners use e-file nail drills safely?
Yes, beginners can use e-file nail drills, but they should start with lower speeds and practice proper handling techniques to avoid injury.
How do I clean and care for my nail drill bits?
Clean your bits by soaking them in a disinfectant solution and scrubbing gently. Store them in a dry place to prevent rusting and replace them when they show signs of wear.
What are common mistakes to avoid when using nail drill bits?
Avoid using the wrong bit for a task, applying too much pressure, or using bits that are worn out, as these can damage nails or cause injury.
How do I know when to replace my nail drill bits?
Replace your bits when they become dull, chipped, or if they no longer perform as they should. Regular inspection will help you determine when it’s time for new ones.